Time-In Corner Setup Tutorial shows how to build a calm, supportive nook. Learn layout, supplies, and scripts that teach regulation. Create predictable routines that protect boundaries while keeping connection warm.
- Purpose and principles of a time-in corner
- Choosing the right spot and layout
- Supplies and tools that actually help
- Visual cues, scripts, and teaching routines
- Using the corner during big feelings
- Maintenance, hygiene, and safety tips
- Adapting for ages, sensory needs, and small spaces
Purpose and principles of a time-in corner
A time-in corner is not a punishment place. It is a small station for co-regulation. The goal is nervous system support, not isolation. Children learn to pause, label feelings, and choose tiny tools. Adults coach gently, then step back.
What a time-in corner is
The corner offers predictable cues, soothing inputs, and short routines. It helps a child shift from overwhelm toward calm. You sit nearby at first. You model breath, words, and tiny choices. The space becomes a bridge back to play.
Why time-in supports boundaries
Boundaries land better when bodies feel safe. A time-in corner lowers arousal and invites cooperation. You still name limits clearly. You also offer a path to succeed. Practice builds skill. Skill reduces future friction and tantrums.
Core rules for success
Keep the space simple, consistent, and reachable. Keep tools visible and easy to use. Keep your words short and warm. The corner works because it repeats. Repetition turns help into habit.
Time-in vs time-out in plain words
Time-out removes a child from the group. Time-in brings support to the child. You reduce stimulation, not connection. You repair, then rejoin. Discipline becomes teaching plus safety, not distance plus shame.
Choosing the right spot and layout
Place the corner where family life flows. Avoid hallways with constant traffic. Avoid bedrooms used only for sleep. Choose a spot you can reach fast. Choose a spot your child can reach independently.
Where the corner lives best
Look for a wall near shared space. Kitchens, living rooms, and playrooms work well. The spot should feel cozy, not hidden. Light should be soft and steady. Outlets should be safe and covered.
Comfort without clutter
Use one soft rug or mat. Add one small cushion. Add a low shelf or bin. Keep the footprint tight. Tight spaces reduce decisions. Fewer decisions mean easier success.
Lighting and sound
Use a warm, dimmable lamp if possible. Avoid bright overhead lights. White noise is optional. Soothing sound should be low. Quiet is often enough. Consistency beats gadgets.
Five-step layout plan
- Place a small rug against a plain wall.
- Set a low bin or shelf within arm’s reach.
- Add one seat or cushion for each person.
- Hang one simple visual at child eye level.
- Store one or two tools per “need” on the shelf.
Follow the same plan in every home location. Predictable placement teaches faster than long talks.
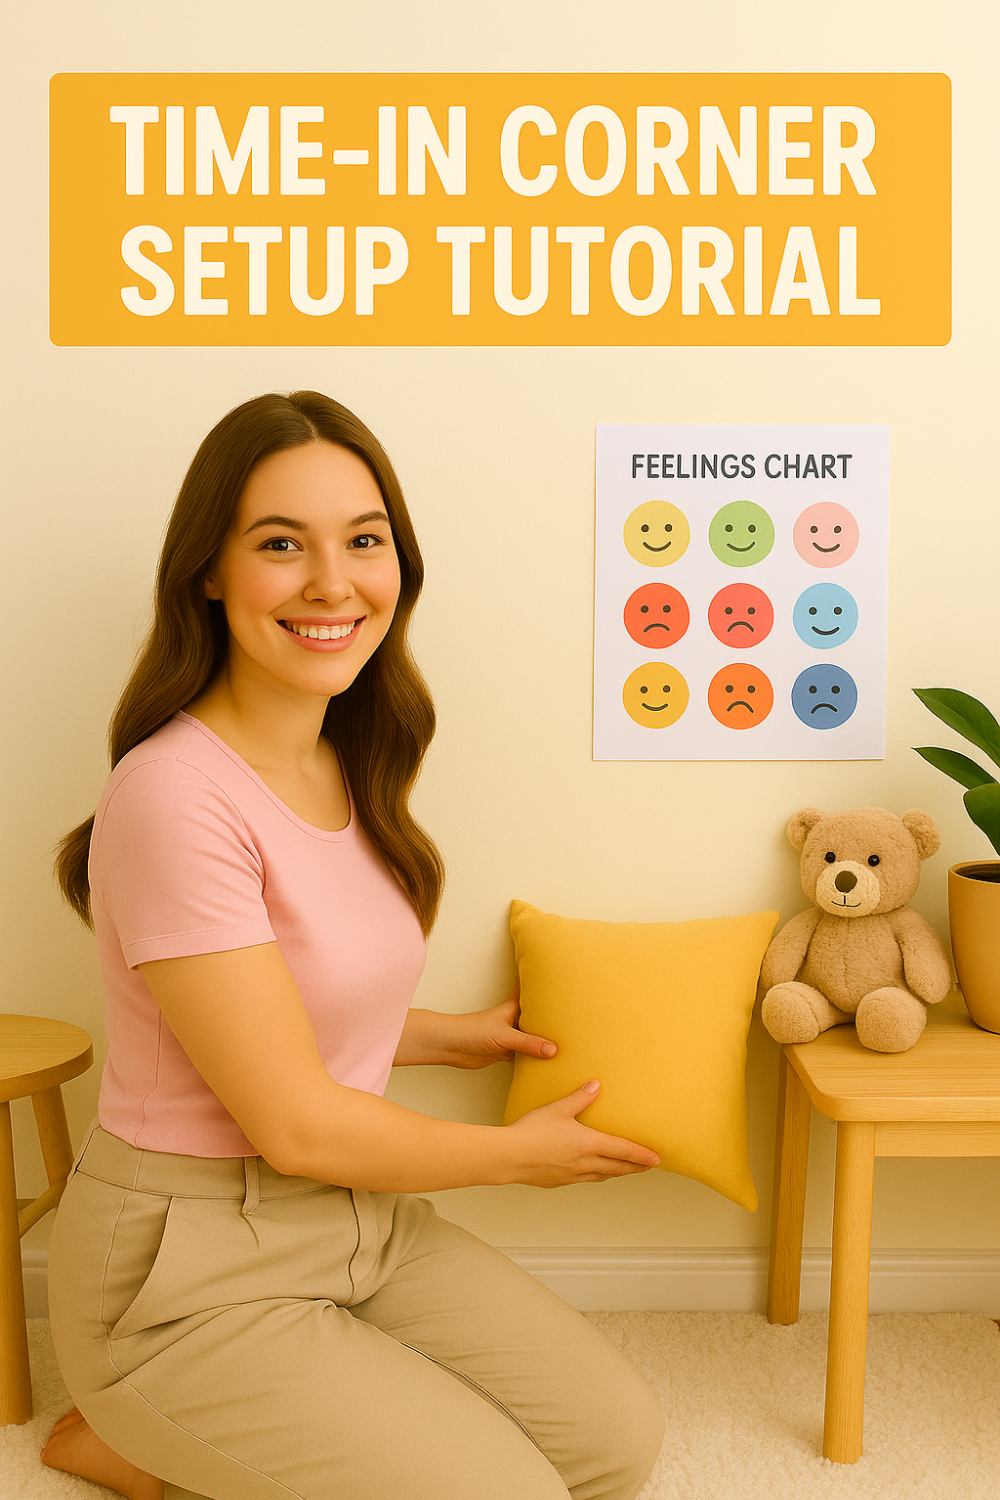
Supplies and tools that actually help
Choose tools that meet three needs: label, regulate, and return. Labeling means words or pictures for feelings. Regulating means breath, movement, or sensory input. Returning means a small plan back to the group.
Essentials you will use daily
- Small timer with clear display for short pauses
- Feelings card or mini chart with simple faces
- Soft squeeze item or pillow for pressure needs
- Picture book that models calming choices
- Water bottle or straw cup within safe reach
- Simple “breath card” with two-step picture cues
- Sanitized fidget with smooth textures, not noisy parts
These items stay in the corner. Duplicates live in bags or classrooms. Your child learns the same tools everywhere.
Optional add-ons that stay simple
Consider a weighted lap pad if recommended by your clinician. Consider a small fan behind you, never on your child’s face. Consider noise-reducing earmuffs during loud family hours. Keep add-ons light. Heavy kits invite clutter.
What to skip and why
Skip messy crafts and snacks in this space. Food complicates hygiene and focus. Skip screens as calming tools. Screens can mask cues and raise arousal later. Skip scented items that may irritate skin or noses.
Visual cues, scripts, and teaching routines
Visuals reduce language load. Scripts keep words short and kind. Routines make the corner easy to start and end. You are building a repeatable micro-lesson.
Visuals that teach without words
Post a small feelings card at eye level. Add a two-step breath strip beside it. Place a “Next step” card on the shelf. The card shows one picture for rejoining play. Pictures anchor action when brains feel flooded.
Three-part micro-lesson
- Name what you see. “Tight hands. Big mad.”
- Offer two tools. “Squeeze pillow or slow breaths.”
- Bridge back. “Timer ends, then blocks again.”
Teach this flow during calm times first. Practice for sixty seconds daily. Short, happy reps build recall under stress.
Script lines that land
“You are safe. I am here.”
“Feelings come and go.”
“Say it with me. ‘I can breathe, then choose.’”
“Timer is for resting, not punishment.”
“Ready hands, then we rejoin.”
Keep lines the same each day. Familiar words reduce pushback and fear.
Practice games that build skill
Use “pretend frustration” with blocks that wobble. Model naming your own feeling. Pick a tool. Set a ten-count timer. Cheer the rejoin step. Games turn learning into muscle memory.
Using the corner during big feelings
During storms, order matters. Safety first. Connection next. Tools after that. You are coaching the body back to steady. Light words and slow breath carry most of the work.
Read the body before words
Scan shoulders, hands, and eyes. Tight fists and fast breath need pressure or movement. Soft shoulders and tears may need cuddles and breath. Match a tool to the body you see.
Six-step calm cycle
- Move to the corner together. Keep steps slow.
- Ground with one sentence. “You are safe with me.”
- Choose one tool. Use it for one minute.
- Label the feeling with a picture or word.
- Set a brief timer to end the pause.
- Bridge back. “Blocks again or book first?”
Repeat the cycle as needed. Stop early if calm arrives. The point is readiness, not endurance.
Coach with presence, not pressure
Sit at your child’s level. Keep your shoulders low. Breathe longer than your child. Let silence do half the work. Speak only one line each breath. Coaching beats commanding during floods.
Handle refusals without power struggles
If your child refuses the corner, shrink the corner. Sit on the floor nearby. Offer one tool in your open hand. Hum a slow line. When breath slows, try again. Success may start two feet away.
Close the loop every time
Say one clear rejoin line. “You calmed; now we share trucks.” Action follows the words. Predictable endings build trust. Trust lowers resistance tomorrow.
Maintenance, hygiene, and safety tips
A tidy, clean corner invites use. A safe corner invites confidence. Your reset rhythm matters more than fancy gear. Keep resets short and visible.
Daily reset rhythm
Clear used tissues or wipes. Restock the water cup. Return tools to the same spots. Check the visuals for straight lines. Small resets keep the corner welcoming. Two minutes is enough.
Weekly refresh that takes minutes
Wipe surfaces with a mild cleaner. Launder the cushion cover. Review tools that never get used. Remove extras to reduce choice fatigue. Replace anything frayed or broken.
Safety checks that never skip
- No cords, strings, or dangling tags within reach
- No choking-size items on the low shelf
- Rug or mat lies flat without curl
- Lamp is stable and cool to touch
- Tools are clean and intact, with smooth edges
Safety checks protect calm. Calm protects learning. Learning protects tomorrow’s routines.
Hygiene that respects skin and lungs
Choose fragrance-free cleaning products. Avoid aerosol sprays. Air the space daily. Wash soft items weekly. Offer water in a closed cup. Good hygiene keeps the corner trusted and comfortable.
Adapting for ages, sensory needs, and small spaces
One size does not fit all. Adapt the tools and visuals to your child’s age and profile. Keep the structure the same. Structure teaches predictability. Predictability supports boundaries kindly.
Age adaptations that work
- Toddlers: One visual, one tool, one minute. Sit close.
- Preschoolers: Two visuals, two tools. Add a feelings word.
- Early school-age: Add a short “plan” card. Invite self-start.
Trust your child’s pace. Progress shows as faster recoveries and smoother re-entries. Perfection is not the goal. Practice is.
Sensory supports without overwhelm
For movement seekers, add wall pushes or a small push pillow. For sound sensitivity, reduce nearby noise and dim light. For oral seekers, offer a safe chew necklace if appropriate. Sensory tools meet needs before behavior spikes.
Small spaces and travel
A corner can be a mat and a pouch. Use a clipboard for visuals. Pack a mini kit: breath card, small timer, and squeeze item. Recreate the layout at grandparents’ homes. Familiar placement calms unfamiliar rooms.
Sibling and shared spaces
Post the same visuals in each shared room. Teach siblings a quiet helper role. “Bring the pillow.” “Set the timer.” Roles reduce crowding and noise. Many small helpers keep the space respectful.
Cultural touches that comfort
Add a family photo or greeting in your home language. Familiar words and images increase safety. Safety increases cooperation. Small details carry meaning.
Frequently Asked Questions
How long should a time-in pause last?
Short is best. Aim for one to three minutes. End when the body softens and breath slows. The goal is readiness, not a countdown.
How often should we use the corner each day?
Use it as needed. Practice once daily during calm. During storms, return as often as it helps. Repetition builds comfort and skill.
What if my child refuses every tool?
Shrink the choice. Offer one tool only. Sit nearby and breathe slowly. Start with presence. Try tools again once arousal drops.
Will a time-in corner replace consequences?
No. It supports regulation so consequences can teach. Use logical steps after safety returns. Repair, then rejoin the group.
Can schools or caregivers use the same setup?
Yes. Share your visuals and scripts. Keep the steps identical. Matching language across rooms speeds progress and confidence.